
Ver. 4.2.0 or later of Unifinity Studio will use CData'sCData API ServerandCData ConnectThe OData created in OData can be read to automatically build tables in Unifinity Studio and automatically generate logic for sending and receiving data.
In order for the app to send and receive data from external services using OData integration, the device must be connected to the Internet.
OData must be created beforehand with CData API Server or CData Connect in order to perform OData integration. Please contact our sales staff if you wish to collaborate with us.
To link with OData, click the OData Linkage button on the menu bar.

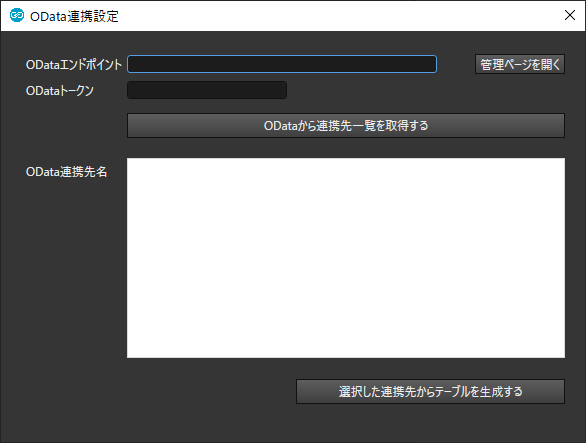
OData Linkage Settings
Connect to OData and set up the linkage destination.
| item name | Description. |
|---|---|
|
OData endpoints |
Enter the API endpoint for CData API Server or CData Connect. It can be found on the "API" tab of the administration page. (e.g., https://www.example.net/cdata/api.rsc/) |
|
Open Administration Page |
If an endpoint has been entered, open the administration page in your browser. |
|
OData token |
Enter a token to access OData. It is listed as "Authtoken" in the "USERS" tab on the administration page. |
|
Obtain a list of collaborators from OData |
Load the list of collaborators from OData. From the loaded collaborations, select the collaborations to be linked. |
| Generate a table from the selected linkage |
Link with the database selected in the OData linkage list. |
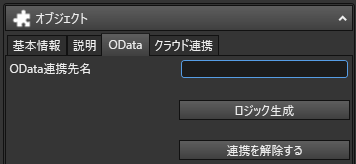
OData
After OData linkage, an "OData" tab is added to the "Objects" pane.
| item name | Description. |
|---|---|
|
OData Partner Name |
The name of the OData collaborator with which you are collaborating. |
|
logic generation |
Automatic generation of processing design files and logic for sending stored data to OData's API and receiving data using OData's API. If it has already been generated, it will be overwritten. |
|
Delete linkage |
Disengage with OData. |
About the generated tables
The following tables are automatically generated when OData linkage is performed.
| table name |
Description. |
|---|---|
|
data table |
This table is automatically constructed based on the information in the linked OData. |
| Field Information Table |
The file name ends with "_field information". This table records field information based on the information in the linked OData. |
| work table |
The file name ends with "_worktable". This table is used to edit data in the Unifinity application. |
How to use the generated logic
Logic to send/receive data or perform operations with OData is automatically generated when linking to OData or when the [Generate Logic] button is clicked.
| logic name (programming language) |
Description. |
|---|---|
|
user-configurable logic |
Logic that sets the behavior of the logic. The next section will provide more details. |
| work table initialization logic |
Logic to initialize the work table. Used to clear screen entries when moving to the edit screen, for example. |
| generic logic |
Logic that describes common processes referenced by other logic. No editing is required. |
| update logic | Set up this logic when updating work table data to the cloud database, such as when a button is pressed. |
| Deletion Logic | Set this logic to delete work table data from the cloud database when a button is pressed, for example. |
| Writing Logic | Set this logic to add data from the work table to the cloud database when a button is pressed, for example. |
| read-only logic | Set this logic to retrieve data from the cloud database and store it in the data table when a button is pressed, for example. |
| Logic for Table Touch | Set this logic for the transition to the edit screen when a table displaying the contents of a data table is touched. |
How to set up user configuration logic
In the user configuration logic, there are items colored yellow as shown in the figure below.
Select each item and edit the content as needed.

How to display the data list
In Screen Design, create a screen for the listing and set the "Data Table" in the Data pane. For information on how to set up, see "3. change properties of screen design fileSee the contents of the "Data" pane in the "Data" section.
Then, place the "Table" on the list screen, select "Form" on the "Contents" tab of the "Data" pane, and then select the fields to be set for the table from the "Display Items". Display items should include items that are primary keys in the "Data Table".
As for setting up the table, see "table (e.g. Table 1)See "Data Form Setup" in the "Data Form Setup" section.
If "Logic for Table Touch" is set in the "Execution Process" of "Table," a transition to the edit screen can be made when a table item is pressed.
How to create an edit screen
In Screen Design, create a screen for data editing and set up a "work table" in the [Data] pane. For information on how to set up, see "3. change properties of screen design fileSee the contents of the "Data" pane in the "Data" section.
Then, place a text box or other input item on the editing screen, select "Form" on the "Contents" tab of the "Data" pane, and then select the field to which the placed control is linked.
As for the settings, "text boxSee "Data Form Settings" in each control such as
How to set up the choices on the edit screen
If there are items in the external database settings that allow multiple selections (e.g., multiple selections of checkboxes), additional settings are required.
On the edit screen, place the required checkboxes as choices, with the ON value to be set and the OFF value to be left blank. Checkboxes do not need to be set for [Form]. As for the settings, "checkboxPlease refer to the "See
Then, in the [Get Choice Values] field of the [User Setup Logic], enter "Screen Name, Field Name, Target Control 1, Control 1 Value, Target Control 2, Control 2 Value,...".Please tie the checkboxes to the values that can be set in the choices in the form of
For example, if there is a field named "gender" in the external database that records the gender, and "male (male)", "female (female)", and "other (other)" can be selected, create a screen named "edit screen" and place check box controls named "check1", "check2", and "check3" on it. The ON value for "check1" should be set to "female," the ON value for "check2" should be set to "female," and the ON value for "check3" should be set to "other," and the [Get Choice Value] field in the [User Settings Logic] should be set as shown below.

Supplemental information for linking with kintone
Please also refer to the following information when linking to KINTONE as an external database.
About the Table
If an application created in kintone contains "tables", a linkage destination with "_table" is added to the OData. If you also want to use the contents of a "table" in kintone from Unifinity, please also link the linked destination with "_table".
About parts that can be linked
Of the components that can be set in an app in kintone, the following components cannot be used in Unifinity.
- Labels.
- attachment
- User Selection
- Organizational Selection
- group selection (in evolutionary biology)
- List of related records
- space (room, area, outer space)
- ruled line
Of the components that can be set up in an application in kintone, the following components must be used with caution in Unifinity.
| kintone part name |
important point |
|---|---|
|
rich editor |
HTML tags are displayed in Unifinity as they are. |
|
radio button |
The ON value of the radio button placed on the edit screen must be set to a value that can be entered. |
|
checkbox |
The above-mentioned "How to set up the choices on the edit screenThe "Mere Old Man" needs to implement the "Mere Old Man. |
| Multiple Selection |
The above-mentioned "How to set up the choices on the edit screenThe "Mere Old Man" needs to implement the "Mere Old Man. |
| link |
The URL will appear in Unifinity as is. Behaviors such as "open browser on touch" need to be created by the user. |
| look up |
The "Prohibit duplicate values" must be set in the kintone settings. Also, sending data from Unifinity that is not selectable in the lookup on the kintone side will result in an error. |
| group (usu. of people) |
Parts that exist in a group can be linked. It is not possible to obtain in Unifinity which parts belong to a group. |
| table |
The above-mentioned "About the TableIt is necessary to keep in mind that "the |