1. Outline
Unifinity can store information entered into the app screen in a database or retrieve information from the database and display it in the app. Databases make it easy to store and retrieve data.
This article explains how to register data in a database using three methods: "data form linking," "database logic," and "SQL logic. Brief characteristics of each method are as follows
|
Data Form Linkage |
By linking forms (screens) with tables, controls and Tables can be tightly linked. Contrast on form Automatically stores entries into roles in a table in real time This is useful when it is necessary to |
|---|---|
|
database logic |
The table is overwritten by triggering a button operation such as "Register". Yes. In addition to reducing database reads and writes, errors It also enables detailed settings such as input detection. |
|
SQL Logic |
SQL statements can be used to access the database. Recommended for those familiar with SQL statements. |
The sample project used in the explanation can be downloaded from the following link. We hope you will take advantage of it.
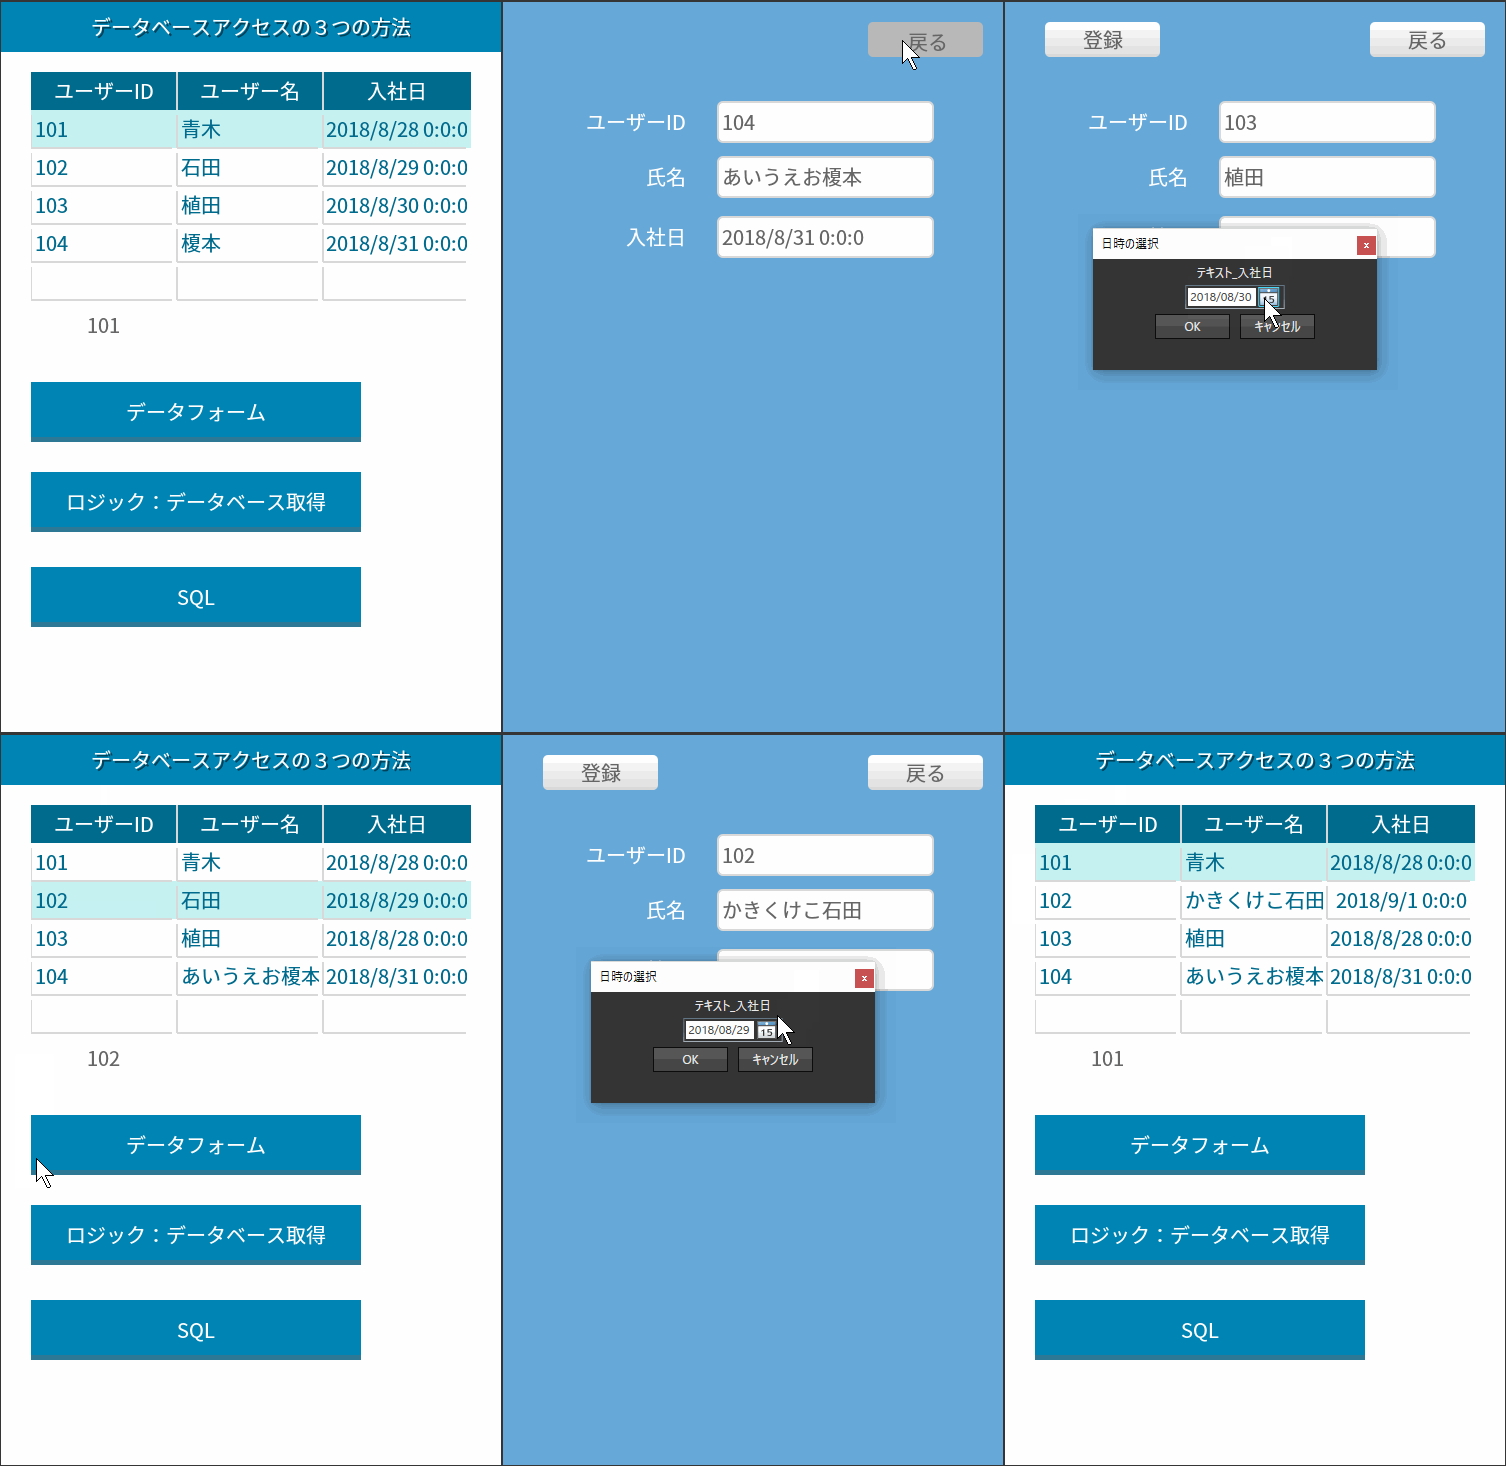
2. Operation image
3. Mounting method
After creating screens and tables, we will set parameters or create logic to realize each access method. If you would like to know how to implement database access specifically, please start from 3-3.
3-1. Create a screen
The five screens, including the top screen, are created in sequence.
3-1-1. Top Screen
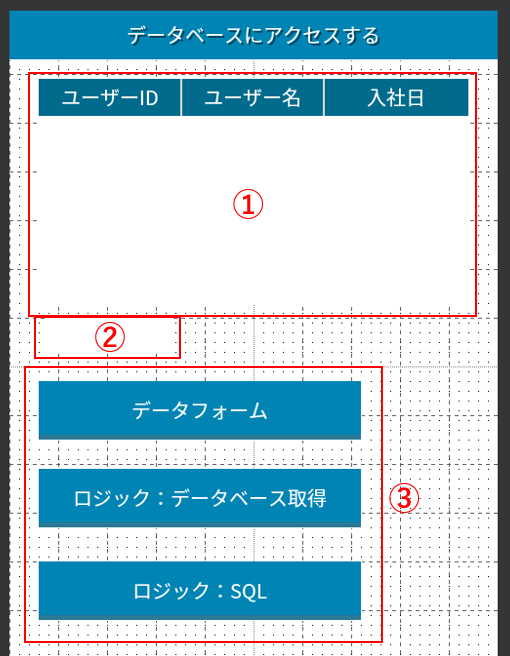
Create a new form from the screen design function and place button and label controls, and table controls for displaying table contents in the following manner.
(1) Table
(2) Label
(3) button
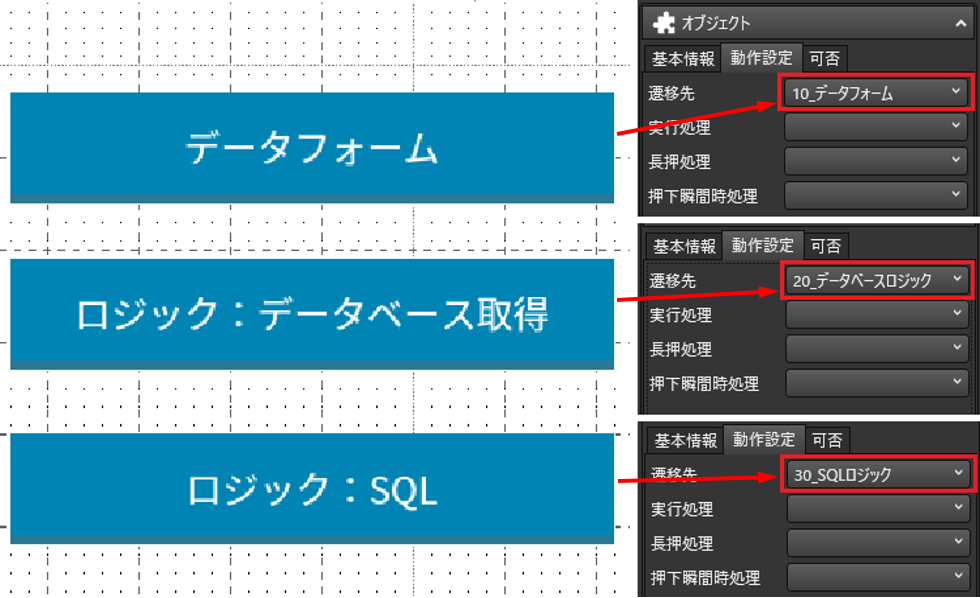
Next, set the screen transition destination for each button. Select the button control on the top screen, then select "Object" > "Behavior Settings" > "Transition Destination" and set the screen to be transitioned to.
3-1-2. Creating Data Form Linkage Screen
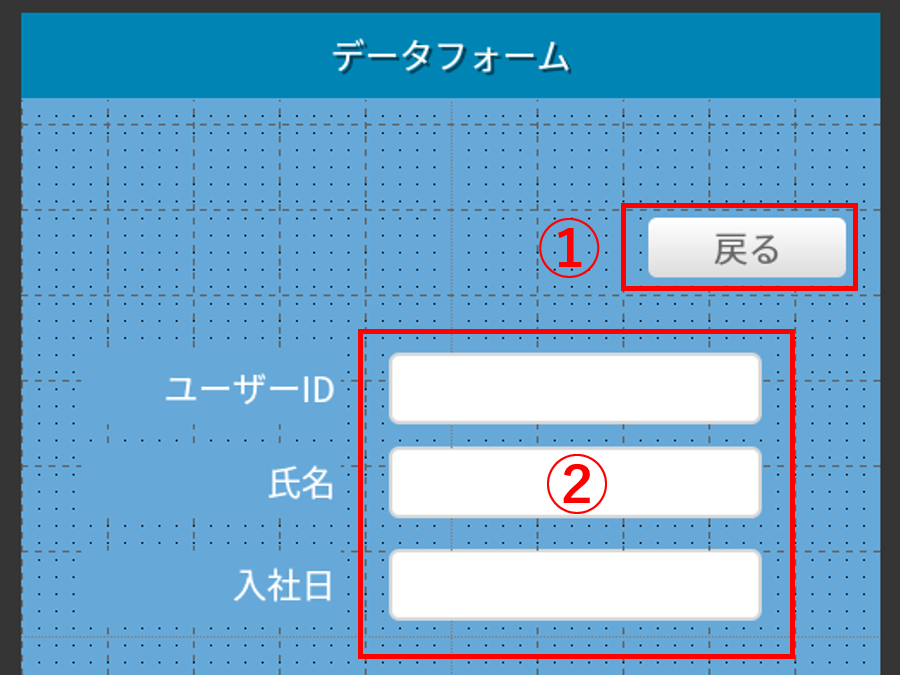
Create a new screen as follows and place buttons and text controls in it.
(1) Button
(2) Text
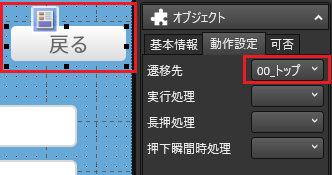
Set the screen transition destination for the "Back" button. After selecting the button control, select "Object" > "Behavior Settings" > "Transition Destination" to set the destination screen.
3-1-3. Creating the Database Logic Screen
Create a new screen as follows and place buttons and text controls in it.
(1) Button
(2) Text
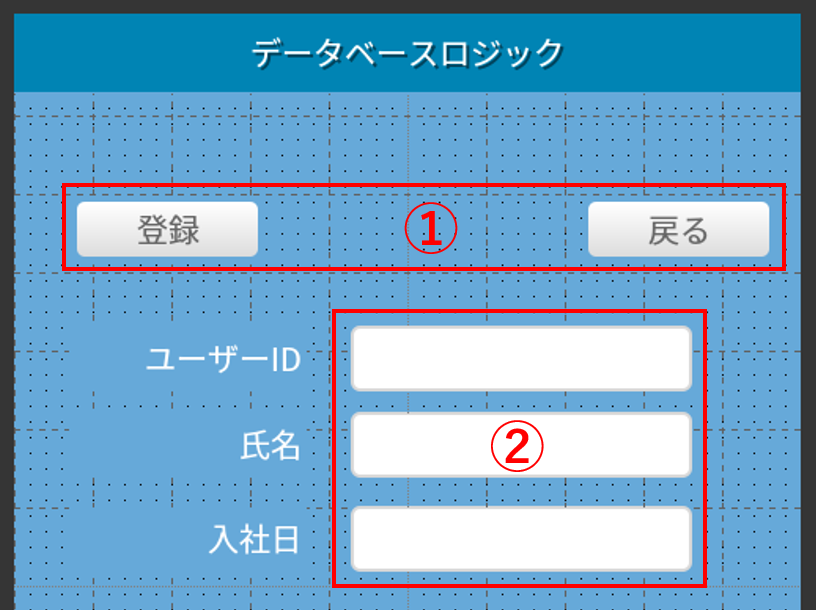
Set the destination for the button with reference to 3-1-2 and 3-1-3.
3-1-4. Creating SQL Logic Screens
Create a new screen as follows and place buttons and text controls in it.
(1) Button
(2) Text
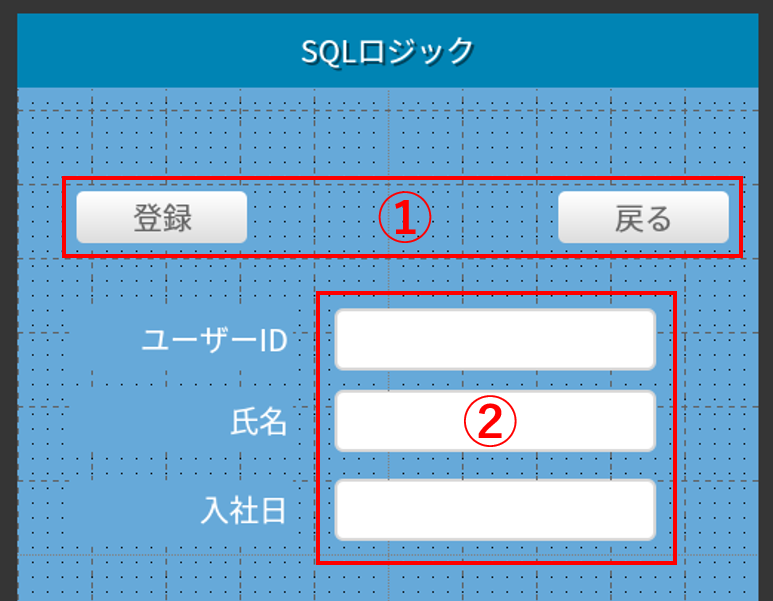
Set the destination for the button with reference to 3-1-2 and 3-1-3.
3-2. Set up the database
3-2-1. Creating Tables
Create and configure new tables from the DB design function.
After generating a new table, set up the items in the following manner so that the entries for user ID, user name, and date of hire can be saved, respectively.

3-2-2. Table contents are displayed in the application
There are several ways to display the contents of a table in an application, but here we will use data forms.
Select the top screen created in 3-1-1, then select "Data" in the Properties area and specify the table created in 3-2-1 in the "Table Name" field.
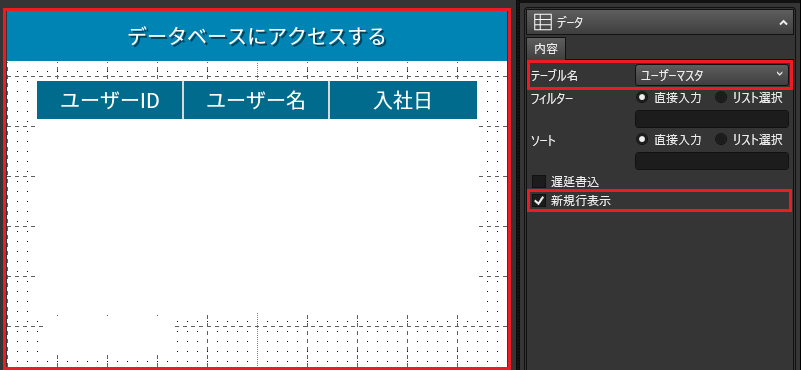
Next, set up data forms for the tables placed in the top screen and also for the label controls.
First, select the table control and then select "Data" > "Contents" > "Form". Specify any number for "Number of rows displayed" and check the "Column header" and "Row selection" check boxes.

When "Display Items" is selected, the "Display Item Settings" dialog box appears. Double-click on an empty square in the dialog to set the display items.
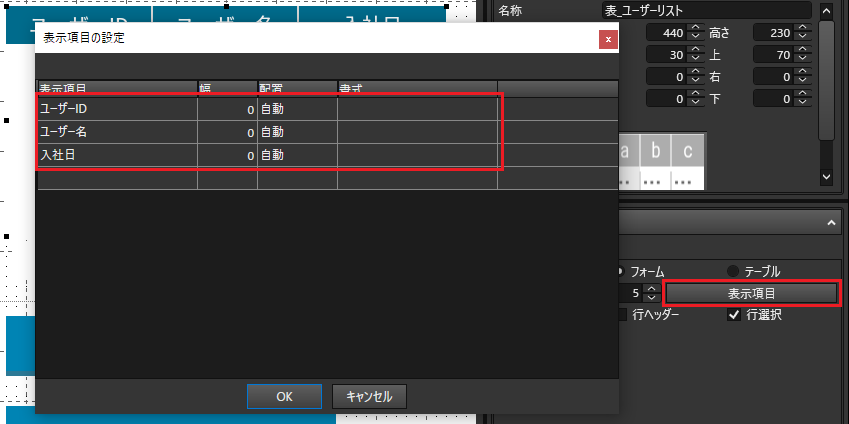
3-2-3. Share information on the selected row on the top screen with other screens
By sharing the information pertaining to the row selected on the table control of the top screen with other input screens, the data of the row selected on the top screen can be set when the input screen is opened, and the data in the table can be edited.
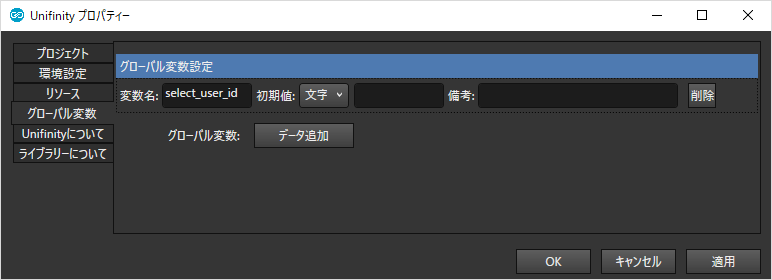
First, set a global variable to store the "user_id" of the selected row from the top screen table.
Global variables are registered by setting the "variable name" from "Properties" > "Global Variables" in the TOP menu. Here the variable name is "select_user_id".
Next, set up a data form in the label control on the top screen.
After selecting the label control, select "Data" > "Contents" > "Form" and specify the appropriate item name as the "Field Name".

Finally, create the logic to set the global variables and register it in the table control on the top screen.
The logic for setting global variables is as follows

In #1, the contents of the label with the data form settings above are retrieved, and the value retrieved in #2 is set as the value of the global variable.
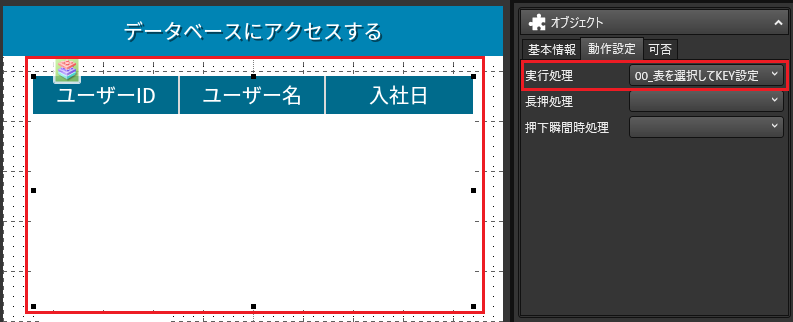
Set the created logic to the table control on the top screen as follows When a table is selected, the above logic is executed and the information in the selected rows is automatically registered in the global variable.
3-3. Utilize data form linkage
Data can be registered and edited from the input screen using the data form linkage function.
3-3-1. Data Registration
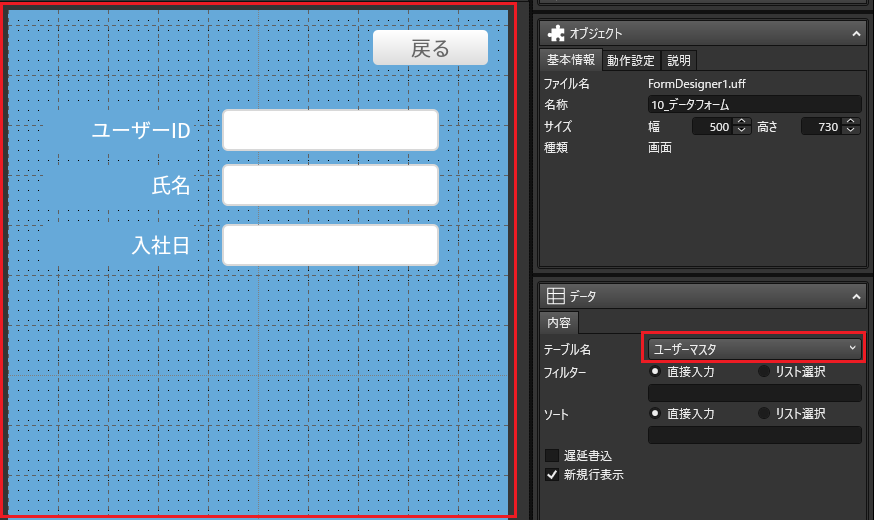
Select the data form linkage screen created in 3-1-2 and configure the data form settings.
First, select "Data" in the Properties area with the screen selected, and specify the table created in 3-2 for "Table Name. This makes the data form valid.
Next, set up a data form for each control.
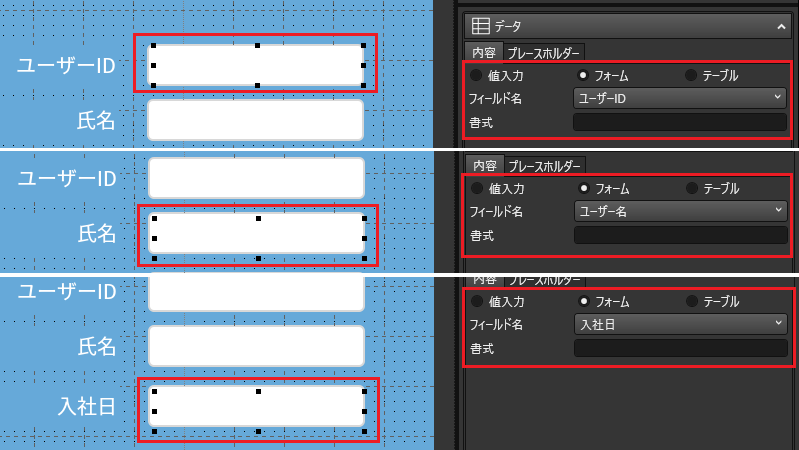
After selecting each control, select "Data" > "Contents" > "Form" and specify the appropriate item name as the "Field Name.
3-3-2. Retrieving and Editing Data
When the data form screen is opened, the data of the row that was selected on the top screen is retrieved and displayed in the input field. Implement by registering logic to generate and load a data set in the open process of the data form linkage screen.
Data sets are internal tables that serve to temporarily store data between controls and tables. Details,About the Data Set."for more information.
First, let's create the logic. The logic is as follows

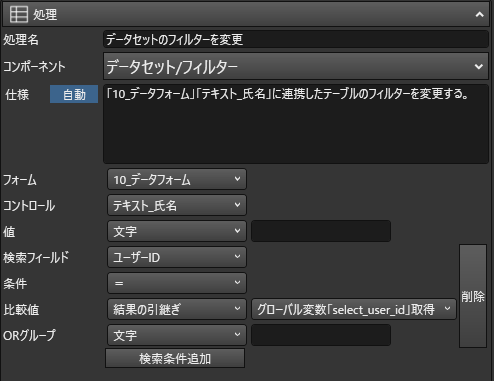
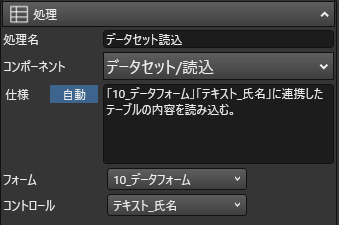
Retrieve the global variable set in 3-2-3 in #1 and extract the "user ID" equal to the value of the global variable retrieved in #2. #3 reflects the data set generated from the logic in the controlLogic. Note that this is not reflected in the "control/update" logic.
Parameter settings for #2 and #3 are as follows
This completes the data form linkage setup.
Run the application from the "Run" button on the menu icon to register data from the data form linkage screen, or select and edit the registered data on the top screen.
If the test data entered on the data form linkage screen can be confirmed after returning to the top screen, it is a success. You can also edit the selected data by proceeding to the data form linkage screen with the data selected on the top screen.
3-4. Utilize database logic
Even without data form linkage, the database logic can be used to create screens for registering and editing data in the same way.
3-4-1. Data Acquisition
When the screen is opened, the data of the line that was selected on the top screen is retrieved and displayed in the input field. This is implemented by registering logic to acquire data from the database and set it in each control in the open process of the Database Logic Linkage screen.
The logic to be created is as follows Registered in the sample project.

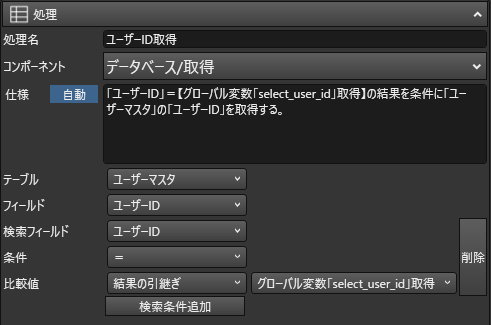
Obtain the global variables set in 3-2-3 above in #1. Logic #2 through #7 select rows whose "user ID" is equal to the value of a global variable retrieved from the database, retrieve the "user ID," "user name," and "hire date," respectively, and set them in each control. The parameter settings for #2 are as follows
3-4-2. Updating Data
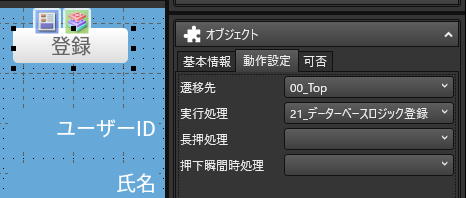
Create logic to overwrite the text entered in the database logic screen with the contents of the database, and register the logic in the Register button on the database logic screen.
First, create the logic. The logic of the sample project is as follows

The logic in #1 through #3 retrieves the contents from each text box and overwrites the "user ID" data equal to the user ID retrieved in #4. The parameters set in the #4 logic are as follows

Set the logic you have just created in the "Execution Process" section of the "Register" button on the database logic screen.
This completes the database logic setup.
Run the application from the "Run" button on the menu icon and try to see if it is set up correctly.
Proceed to the database logic screen with the test data entered by data form linkage selected, change the user name or hire date of the displayed test data, and press the "Register" button. Return to the top screen to see if the test data values have changed.
3-5. Utilize SQL logic
Besides database logic, logic can also be written using SQL statements.
3-5-1. Data Acquisition
Create logic to retrieve data from the database and set it on the SQL screen using SQL SELECT statements, and register the logic in the SQL screen's open-time processing.
The logic of the SQL SELECT statement to retrieve data from the database and set it on the SQL screen is as follows

Retrieve the global variables set in 3-2-3 in #1. #2 is the logic to retrieve the same row of data by using a SQL SELECT statement to search for a "user ID" that is the same as the value of the global variable that was retrieved. From #3 onward, retrieve the "User ID," "User Name," and "Joined Date" from the rows retrieved in #2, respectively, and place them in each control.
The SQL execution logic parameters and SQL statements are as follows Parameters are assigned to the point in the SQL statement where the "? in the SQL statement, a parameter is assigned.

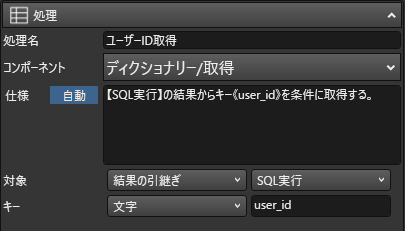
The logic for obtaining a #3 user ID is as follows Retrieve the data where "user_id" is the key from the data based on the results.
3-5-2. Updating Data
Create logic to update the text content of the SQL logic screen to the database with an SQL UPDATE statement and register it with the Register button on the SQL screen.
The logic is as follows The same logic is registered as "Execute SQL" in the sample project, so please refer to it as well.

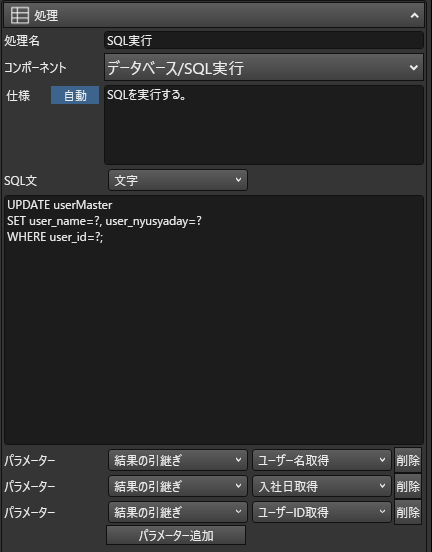
Get values from each control in #1 through #3. #4 is a SQL UPDATE statement that selects and updates a row with the same "user ID" as the value retrieved from the database.
#4The parameter settings and SQL statements for the SQL execution logic are as follows If multiple parameters are set, they are assigned to the "? in the SQL statement in the order in which the parameters are set.
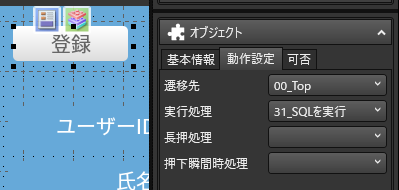
Register the logic you have just created in the "Register" button on the SQL Logic screen.
This completes the SQL logic setup.
Run the application from the "Run" button on the menu icon and try to see if it is set up correctly.
Proceed to the SQL Logic screen with the test data entered through the data form linkage selected, change the user name or hire date of the displayed test data, and press the "Register" button. Return to the top screen to see if the test data values have changed.
4. Related Documents
control reference
logic reference
- Dataset/Filter
- Data Set/Read
- Database/Retrieval
- Database/Update
- Database/SQL Execution
- Dictionary/Acquisition
